GPXPosterPrint – Sports Activity Poster Printing
Lots of people will be using smart watches, bike computers and mobile app’s to record sports activities, before sharing them on platforms like Strava. After a completing a challenging event or race, a poster is a good way to remind yourself (and others!) of your achievements. The common file format for the recordings of the activity is GPX and this file provides a way to generate the map for the poster.
I’ve previously used a business on Etsy to create a poster for me – back in 2023 I paid £12 to receive a PDF file ready to print. Having recently completed some big bike rides, I wanted a couple more matching posters for my study. The same seller now charges £48 just for a digital download! Looking around I found some other companies offering a similar service from £15 upwards but as I wanted all the posters to match, I’d be spending £45 (before printing) to get three files.
Seeing those prices prompted me to put a little project called GPXPosterPrint together. As full disclosure, I had some help from Google Gemini as I’d still be working out some of the maths and GPX/GPS processing in a few months time (rather than admiring the results on the wall).
Simply supply a GPX file along with the information for the poster and you’ll get an A3 sized PDF/PNG file ready to print. Hopefully 10 to 20 minutes of effort will get you a poster ready to print, so a nice little saving.
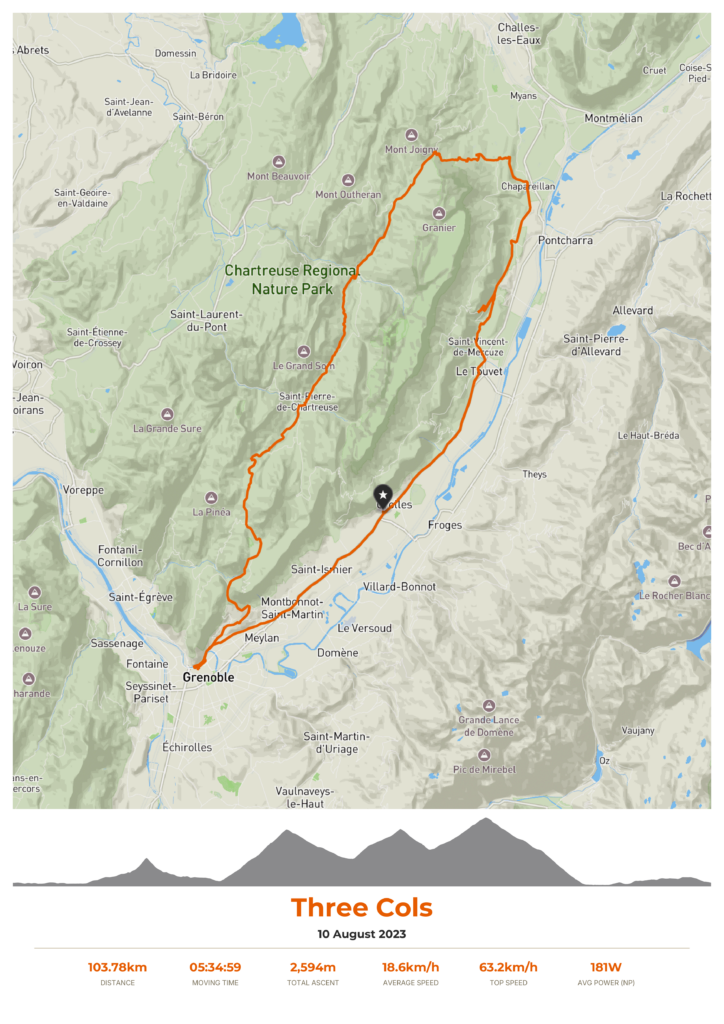
Example Posters
The full size outputs are 3508 x 4961, so ideal for printing at A3. These show some of the options for customising the poster.

Repositories
The GitHub repository for the Python script is:
https://github.com/SynapseCarbon/GPXPosterPrint
Alongside the script, there is also a Docker container ready to go if you don’t want to install Python but do have Docker installed somewhere:
https://hub.docker.com/r/synapsecarbon/gpxposterprint
Mapbox
Both methods of producing the poster use the Mapbox API to get the map background and overlay the activity track onto the map. You will need a Mapbox account to create an access token (key) for the Static Images API.
Mapbox will ask for credit card details for billing during account setup. However, they provide a free tier which allows for up to 50,000 map requests per month for free. So producing a few posters isn’t going to see you spending any money with Mapbox.

It is essential to look after the Mapbox API access key you create. If you leave it in a public (eg an open Github repository), it would be very easy for somebody to use your access key to request lots of maps and see your credit card getting an unexpected hit.
You may wish to delete the API access token once you’ve printed your map(s) and thus minimise the risk to your credit card. Creating a new token takes a few clicks, so it’s not a big task to create a new key in the future.
Creating a Mapbox Access Token
- Create a Mapbox account at Mapbox.com (e-mail, password, billing details) if you don’t already have one
- Login to the Mapbox Console and click Tokens in the left menu bar
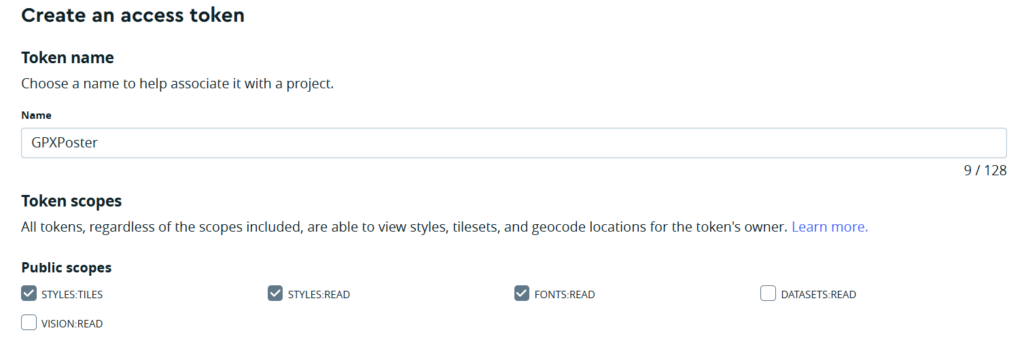
- Click “Create a Token” and on the next screen give the token a name. The permissions the token requires are the first three tick boxes under Public Scopes (as shown below)
- Once done, click “Create Token” and you will see the long string of random numbers / characters which is your token. You can come back to the Console to get this later (unlike some providers such as Cloudflare which only show you API keys once at the point of creation) or you could copy it for safe storage in a password manager like 1Password. Again, do not expose this token to the Internet.
Activity Information Required
To create the poster we need the following items / details:
- GPX file for your activity
- This can be easily exported from Strava, Garmin Connect etc
- Details of your activity
- Essential:
- Event name
- Date
- Between 1 to 6 additional data / metric items about the activity, for instance:
- Distance
- Time (moving or elapsed)
- Average speed
- Maximum speed
- Power output (cycling)
- Calories burnt
- Elevation gain
- Essential:
- Colours for the text are pre-set but can be easily changed if wanted using hex colour codes
Run Option 1: Python Script
If you use Python for other tasks, you might want to setup a Python virtual environment (venv) to keep the libraries used here separate.
Linux
Tasks in the code below were run on Ubuntu 24 which uses python3 when calling Python, so might need tweaking for other Linux distributions.
- Create the folder
- Clone the repository into it (. signifies the current folder)
- Setup a Python venv
- Activate the venv
- Install the Python libraries
mkdir gpxposterprint && cd gpxposterprint
git clone https://github.com/SynapseCarbon/GPXPosterPrint.git .
python3 -m venv .venv
source .venv/bin/activate
pip install -r requirements.txt
Final steps:
- To make life simple, drop your GPX file into the same folder as the Python script
- For the configuration, pick one of these options :
- Copy config.sample to config.toml
- Copy config.sample to a name of your choice eg myride.toml and specify at runtime
- Edit the config file with your information
At this point you should be able to run the script. By default the script looks for config.toml but if you specify a filename as the parameter, it will use that instead.
python3 GeneratePoster.py
or
python3 GeneratePoster.py myride.toml
Windows
If you don’t have Python already installed, then the preferred method for v3.14 onwards is using the Windows Store and finding the Python Install Manager. RealPython has lots of help for this here. The steps once Python is installed are similar to Linux and are run from PowerShell:
mkdir gpxposterprint && cd gpxposterprint
git clone https://github.com/SynapseCarbon/GPXPosterPrint.git .
python3 -m venv venv\
venv\Scripts\activate
pip install -r requirements.txt
If you don’t have git installed for the second command, you can download a .zip file to unpack to your folder (link below). There may be a subfolder inside the zip, so unpack the contents into the folder you created, rather than another subfolder. GeneratePoster.py should be in your new folder eg c:\scripts\gpxposterprint rather than c:\scripts\gpxposterprint\GPXPosterPrint-main.
https://github.com/SynapseCarbon/GPXPosterPrint/archive/refs/heads/main.zip
If all has gone well, the last command of the series above should install the required Python libraries and return to the PowerShell prompt.
To finish:
- To make life simple, drop your GPX file into the same folder as the Python script
- For the configuration, pick one of these options :
- Copy config.sample to config.toml
- Copy config.sample to a name of your choice eg myride.toml and specify at runtime
- Edit the config file with your information
At this point you should be able to run the script. By default the script looks for config.toml but if you specify a filename as the parameter, it will use that instead.
py .\GeneratePoster.py
or
py .\GeneratePoster.py myride.toml
Run Option 2: Docker
As an alternative, you can use a Docker container which has the script and fonts ready to use:
- Create a folder and copy config.sample from the repo into it as config.toml
- Copy your GPX file to the same folder
- Edit config.toml with your information
- Run the Docker container, mapping your current folder (with the config and GPX files in) into the container. The output files should appear in the same folder
Windows (PowerShell)
docker run --rm -v "${PWD}:/app/data" synapsecarbon/gpxposterprint:latest
Linux
docker run --rm -v $(pwd):/app/data synapsecarbon/gpxposterprint:latest
The Result
If everything has worked (for either option), you should see an output like this once the script has finished:
(venv) PS C:\Scripts\gpxposterprint> py .\GeneratePoster.py
GPXPosterPrint started
🔄 Initializing layout engine using profile: 'config.toml'
✅ Success: configuration file passed all structural checks!
Registering fonts...
 -> Montserrat-Bold registered successfully.
 -> Inter-Regular registered successfully.
Parsing 16.7MB GPX file...
 -> Loop detected (63.9m gap). Rendering a single start/end marker.
Requesting map from Mapbox API
 -> Success! Unified map tile asset rendered on layout plane.

✅ PDF poster compiled successfully at: lbl.pdf
Converting PDF to high-res PNG via PyMuPDF (300 DPI)...
✅ Generated high-res PNG at: lbl.png
Your PDF and PNG files should be in your folder ready to review and ultimately print.
Editing config.toml
This section applies to both methods of generating a poster. With a text editor, open your configuration file (eg config.toml or myride.toml) and enter / update the relevant sections. The sections are:
| Field | Value Type | Notes |
|---|---|---|
| [files] | ||
| gpx_filename | String (Filename) | Name and location of the GPX file to process (no path needed if in the same folder as the Python script) |
| output_pdf | String (Filename) | Name for the finished PDF file. The PNG file takes the same name but obviously ends .png |
| [mapbox] | ||
| access_token | String | The Mapbox access token you created in the earlier step |
| style_id | String | The Mapbox style_id used for the map. A default style is provided but other standard Mapbox styles are commented out ready for use. Alternatively, you could create your own style using the Mapbox Style Editor. |
| [theme] | ||
| map_border | Boolean | true / false depending if you do / don’t want a border around the map |
| overlay_elevation | Boolean | true / false if you want the elevation chart on it’s own underneath the map or overlaid on the bottom of the map |
| transparent_elevation_fill | Boolean | If you have overlaid the elevation chart on the map (overlay_elevation), should the chart be transparent |
| transparent_elevation_alpha | Floating (ie 0.8) | How transparent the elevation chart is (if overlaid and transparent both are true). Between 0 & 1. |
| metrics_position | String: “side” or “bottom” | Put the metrics at the bottom of the page or in a box overlaid on the right hand side of the map |
| title_position | String: “left” or “centre” | Text alignment of title and date (or sub-title) |
| colour… | Hexcolor: (eg #ff00ff) | Colour of the relevant background or text |
| [processing] | ||
| target_points | Integer | Best left at 800 – more points can produce a smoother route line but you could make a request which is too large to Mapbox and end up with a blank or black map instead |
| [ride_metadata] | ||
| title | String | The name of your activity |
| date | String | The date of your activity (or a sub-caption) |
| [ride_metadata_metrics] | ||
| value | String | Value of metric eg “265km” |
| label | String | Description of metric eg “Distance” |
Between 1 and 6 ride metrics can be used in [ride_metadata_metrics]. Each metric should have a value and label key pair.
Colours are specified as hex codes – some examples are in the file and there is a handy picker here