CyberPower UPS – ESXi Monitoring & Shutdown
First up, this post is really a summary of a great how to from TinkerTry.
https://tinkertry.com/configure-automated-shutdown-homelab-datacenter-15-minutes
I wanted to move my lab server to a shelf in the eves in my garage but didn’t fancy having to go out there to poke it after a power cut. A UPS was therefore needed – normally I would buy an APC but some Googling lead to me the TinkerTry post and hence a CyberPower PFC 900 was ordered up from box.co.uk (being the cheapest in-stock source).
The TinkerTry walk through is great but there’s around six years of changes spread through the article so it can be difficult to follow, hence putting together something myself.
Step One – Prerequesites
Grab the software used to monitor a CyberPower UPS which is called PowerPanel. There’s a few versions of PowerPanel – the one we want is PowerPanel Business Virtual Machine. You then get another choice – do you want the Local or Remote version?
Use Local (Agent) if you connect the computer to the UPS with a USB or Serial cable. Local (Agent), which is the primary means of communication for a basic setup between a computer and the UPS, supports a limitless number of Remotes (Clients).
https://www.cyberpower.com/in/en/software/sku3
Use Remote (Client) if you connect the computer via your network to the RMCARD installed in the UPS or on a secondary computer connected to the UPS, with a Local (Agent) computer already connected. The RMCARD manages as many as 50 Remotes (Clients).
So as the PFC 900 uses a USB monitoring cable, I grabbed the Local version. At the time of writing, the download links is:
https://dl4jz3rbrsfum.cloudfront.net/software/ppb440-local.zip
If found that link from:
It’s a chunky 1.1GB download, so set it going and pop the kettle on. Put the kettle on even if it downloads in 30 seconds, as it’s always time for brew!
You can also plug the USB cable in from the UPS to your ESXi host.
Step Two – Deploy the VM
Extract the files from the PowerPanel zip file – you should have the VMware template, manifest file (.mf) and virtual HD file (.VMDK)

The PowerPanel software is a CentOS VM, so it’s very quick to deploy. It’ll be going on my home lab which is running ESXi (free) 6.7 Update 2. The template is pre-sized for a single CPU, 1GB RAM and 20GB HD so pretty lightweight.
Log in, and right click Virtual Machines to pick Create / Register VM.

Work through the wizard, picking the OVF and VMDK files from the folder you unpacked the .zip file to on Step 2.


As we need to edit the VM before powering-on, uncheck the “Start Automatically” tick box on “Deployment Options”
I then ran into issue after step 4:


The simple workaround for me here was to click Details (to see the “Unhandled Exception” error window, then hit Escape. If you hit Escape on the first dialogue (with the Details / Reload button), you’ll get dumped out of the wizard. That took me to step 5 “Ready to complete” and I could click Finish to start deploying the VM.

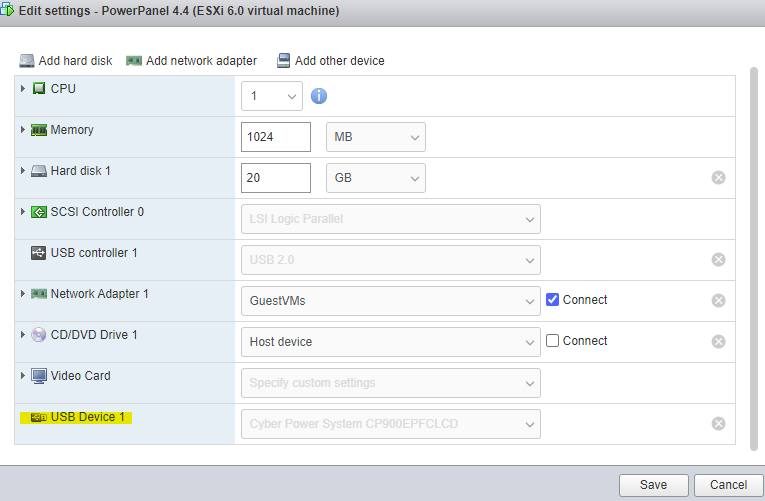
Once the VM has finish deploying, edit the VM and click “Add Other Device”. Pick “USB Device” and all being well, you should see “Cyber Power System UPS…” available.

Save the changes. If you go back in the VM settings, you should see USB Device 1 showing as the CyberPower UPS:
Step Three – VM Housekeeping
Start the VM and before heading in configuring Power Panel, I had some housekeeping to take care of in CentOS. Things I wanted to change were:
- Change the default password (default credentials are admin/admin)
- Give the VM a static IP and set the hostname
- Configure the date/time and timezone correctly
Configure a static IP address in CentOS 7
How to Set or Change a Hostname in CentOS 7
sudo passwd admin
timedatectl set-timezone Europe/London
Step Four – Configure PowerPanel
From the browser of your choice, visit the static IP you configured in step three and add the custom port for PowerPanel. In my case this was:
Login with the default credentials of admin/admin. Again, let’s change the default password by clicking the person icon in the top right corner and clicking “Change Password”:

If everything went great in the previous steps, the left hand menu bar should show the status of your UPS:

To configure the automated shutdown of ESXi, click Settings > Shutdown Events:

Enter the IP of your ESXi server and enter appropriate credentials. I created an extra user in ESXi just for PowerPanel. As a note to creating a ne user, it’s not very intuitive. Create the user in Host > Manager > Security & Users:

Then head back to the ESXi home page (Host) and click Actions > Permissions to actually make your new user an Administrator

Who knows why VMware separated two tasks so much!
That should be everything needed to shutdown ESXi smoothly in the event of a power cut. At this point, you can also configure other things in PowerPanel such as e-mail alerts or perhaps monitor PowerPanel from PRTG with walk-through:
Did this setup actually work for you? The CyberPower software specifically states “Notice: VMWare feature does not support the free edition of ESXi”.
I would really like to have my home lab shutdown when utility power is lost. I haven’t tested this to see if this will shutdown ESXi 6.7 (free), but I have recreated the setup you outline. At some point I will test to see if my VMware server will shutdown when power is lost or if it will continue to run until the UPS batter dies.
Now I think about it, I’m not sure I’ve actually killed power long enough to the UPS for it to trigger a shutdown. Something to try the next time I’m in the garage (and it’s not freezing!)
Thanks for the reply, when I test this, I will post my results.
It will not work with free ESXi for a simple reason – the free edition works in read only mode, so a command to shut it gracefully is not in line with READ ONLY mode. To put it in simple terms. It needs write permissions, thus only a licensed version of VMWare is going to get you what you want.
The same applies to any VMWare/ESXi backup solutions (Veem, Nakivo etc.). Been there, done that….. Nevertheless a nice informative post here, which actually triggered me to setup a static IP on the PPB 🙂