PRTG & Let’s Encrypt
Update – April 2024
I have written an updated article which uses new functionality in Certify SSL Manager to make life easier.
Original Instructions
PRTG is a great monitoring tool, especially as you can get a 100 sensor license for free. That makes it ideal for monitoring home & small networks.
By default it uses a self-signed SSL certificate which generates the usual browser warning errors. Seen as Let’s Encrypt (LE) provide SSL certificates for free, why not do things properly and use a trusted SSL? The small spanner in the works is that PRTG uses it’s own web server, so needs SSL certificates copying to a folder in a specific format (rather than use the Windows local certificate store like IIS).
When I first installed PRTG in my lab, I followed this excellent guide to setup IIS to reverse proxy HTTP to HTTPS (port 8443 on PRTG). That avoided having to mess with the SSL configuration in PRTG.
The ligos.net guide uses the Certify SSL Manager utility to handle the certificate issuing / renewal process with LE. As part of the issuing process, you need to prove ownership of the FQDN of the certificate you are asking for. This can be achieved via HTTP or DNS based challenges.
I hadn’t looked into DNS based challenges, so I had port 80 (HTTP) exposed to the outside world so Certify could answer the challenge from the LE servers. The downside of this is you need to expose a port to the outside world and unless you’re hosting a public facing service, why add a security risk? If your firewall supports it, you could try to schedule the rule to open the port forward at same time as the renewal request but that seems a lot of faffing and a slight time mismatch would see the renewal fail.
I’d also noticed some oddities when trying to add new sensors in PRTG when accessing it on my main desktop PC via the IIS reverse proxy – the sensor setup routine would stall part way through. Adding the sensor from the PRTG server (so avoiding the proxy) worked fine. Hence I decided to revisit the setup in the hope of removing the need for IIS and being able close down port 80.
Using the DNS challenge mechanism for obtaining an SSL looks ideal for an internal service. There’s nothing to expose to the Internet but you need to create a TXT DNS record with a specific key value supplied during the issuing process. You could do this manually but as you need to renew LE certificates every 90 days, that would be a pain.
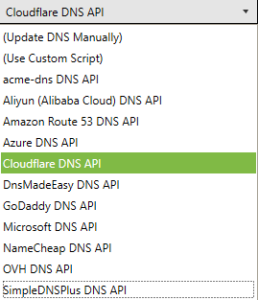
The Certify SSL Manager supports a number of DNS provider APIs to automate the TXT record creation:
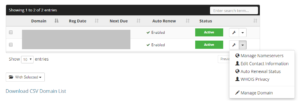
I had to move the DNS for my lab domain over to Cloudflare. There’s no cost for this – the Cloudflare free tier provides everything I needed. Tip – if you need to change the nameservers for a domain with TSOHost, don’t do this on the Custom DNS page by changing the NS values. There’s an extra menu option on the domains index page for “Manage Nameservers”.
Once you have your DNS with Cloudflare (note you don’t need to move the registration away from your current registrar), you need to provide secure access to the Cloudflare API so Certify can create the DNS record for you.
Version 4.1.7 of Certify added support for Cloudflare API Tokens, which offers better security than API keys (this Cloudflare blogs explains why keys have a number of weaknesses).
I have a specific article on creating a Cloudflare API token here. Once you’ve created the token, you can create a Stored Credential in Certify. I called mine “Cloudflare API Token” as shown in the Credentials drop-down below. You’ll also need the DNS zone ID (see here)

On the Deployment page in Certify, choose “Certificate Store Only”

On the “Other Options” page in Certify, check Auto-renew is enabled.
You should now be able to test or even request the SSL using Certify. Once issued, if you want to see the SSL in the local certificate store, run MMC.exe from the Start Menu. Click File > Add/Remove Snap-in and pick Certificates in the left hand list, then click Add. You should then be asked which certificates you want to manage – choose “Computer account”, click Next and then go with the default of “Local computer”. Once the snap-in loads, expand the tree and look in Personal for your shiny new SSL certificate.
Now we have a certificate, we need to get it working with PRTG. There’s free tool available from Paessler to do it manually (here) but hey, half the point of doing all this is for things to work without needing to be poked every 90 days! Hence the last part of this is to head over to Github to get a copy of Andrew Zbikowski’s excellent PowerShell script which does the hard work for you.
Add the PSPKI PS library to your Powershell environment. The only change you might need to make to the script is the path to the the PRTG certificates folder. For me, I edited this to ‘E:\PRTG\cert’
########## Configuration Section
# Where the PRTG certificates live.
$PRTGCertRoot = 'C:\Program Files (x86)\PRTG Network Monitor\cert'
# Let's Encrypt Intermediate CA
$LEIntermediateCA = 'https://letsencrypt.org/certs/lets-encrypt-x3-cross-signed.pem.txt'
########## End of Configuration, no more changes!
Save the script somewhere handy (E:\Scripts for me) and head back over to Certify. On the Scripting page of your request, add the freshly saved script as the post-request script.
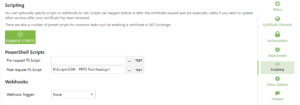
Once Certify obtains a new (renewed) certificate, it will run the PS script to do the chore of getting it into the right format, copying it into the PRTG folder and restarting the PRTG core service. Note: you’ll have a brief outage for PRTG whilst the service restart completes and probes check in again.
Good lord, I’ve been looking for these instructions all over the Internet!! I am going to try this on one of my PRTG servers tonight. Thanks for taking the time to writ it all down!
Glad you found it useful. It’s all worked a treat for me since I wrote the guide – I’ve not had to mess with anything SSL related.